 First things first: chosen by that trusty random number generator, the winner of the lost art of real cooking is melissa – who commented on july 12th. congrats melissa! enjoy! and all of your comments were so inspiring to me! so great to hear about all your pilgrim ways! upon reading through them i had two thoughts:
1. i am not alone.
2. what the hell do they need me for?
then i thought i better step up my game, break out the big cheese… tigress in a dairy? stranger things have happened. ahem.
Some of you may remember my trip to turkey last summer. i fell in love with the country, it’s people and their way of eating. feta is a very common type of cheese in that part of the world, eaten in many ways.
Upon arriving home from turkey last summer i set out to learn how to make it. we’ve been eating it regularly ever since. although it’s slightly more involved than say, homemade yogurt, it’s not all that difficult. and as with anything homemade, once you get the hang of it you can tweak it until you get exactly what your taste buds are looking for.
I cannot begin any discussion about home cheese making without first paying homage to madame fromage – ricki carroll, whom i was lucky enough to take a cheese making workshop with about 3 years ago. her book is to cheese making what linda ziedrich’s book is to pickling. indispensable. and even better her mail-order biz new england cheesemaking supply co. is a one stop shop for everything needed for home cheese making, all artfully packaged in non-threatening home dairy making sizes. and the stuff gets to your door quick!
Feta is a salty cheese traditionally made with sheep or goats milk. store-bought pasteurized goat’s milk is what is needed for this feta recipe, and it should be fairly easy to find, at least at your local co-op or organic grocer, if not your local farmer or farmer’s market.
adapted from home cheese making
1/2 teaspoon liquid rennet or 1/4 vegetable rennet tablet
2 tablespoons cheese salt or sea salt (must be fine grained & contain no iodine) thermometer slotted spoon or flat ladle
fine meshed cheese cloth or butter muslinyield – 1 pound
1. place milk in a large stainless steel pot. heat to 86 degrees. this is how you do it:
Fill the sink with hot water – hopefully in line to the top of the milk, or as close as you can to it.
place the pot in the water with a thermometer and let sit until 86 degrees.
2. once milk reaches 86 degrees, take the pot out of the sink and add the packet of mesophilic starter. stir to combine, cover and let sit for 1 hour.
3. dilute either 1/2 teaspoon of liquid rennet or 1/4 rennet tablet in 1/4 cup cool unchlorinated water. (do not measure this over the milk please! i don’t want you to learn the hard way). add this to the milk and stir in an up and down motion, like this: do this for approximately 3 minutes.
4. cover the milk. reheat the water in sink and place pot back in. bring the milk temperature back to 86 degrees. keep it at 86 degrees for 1 hour. to keep the milk at 86 degrees for one hour you will need to periodically adjust the water by adding hot and/or cold to adjust the temperature.
if you are like me, you probably won’t be able to keep it at exactly 86 degrees for one hour. it will be fluctuating, and you will be dancing with the water, your sink, and the pot. that’s ok.
Put on some good music.
the goal is to let it set for that hour, so if you find that the temperature is too high, and it is not coming down fast enough when you add cold water to the sink, lift it out of the sink for a bit, but do it gently. inside the pot magic is happening; the whey is separating and the milk is starting to coagulate!
5. after one hour take the top off and: happy dance!
6. now you get to cut the curds. you can do this with a curd cutter, or a regular old knife. you want to try and cut the curds into 1/2 inch cubes. if the set is a bit soft and you feel like it will crumble (this batch set soft) you can go a bit bigger on the cubes. start by slicing one way, and then the other. like a tic tac toe grid.
after you’ve cut the grid, you need to cut down. to do this start in the center pointing toward one side of the pot. angle 1/2 inch down and cut across the pot and all the way to the end. then go down 1 inch and do the same, then 1 1/2 inches down and do the same. once you’ve cut one side all the way down to the bottom, start in the middle all over again toward the other side of the pot. yes, i’m available for questions.
7. stir the curds very gently for 20 minutes.
8. place cheesecloth in a colander and pour curds & whey over. lift the cheesecloth up and tie the ends in a knot. hang over the sink to drain for 4 hours.
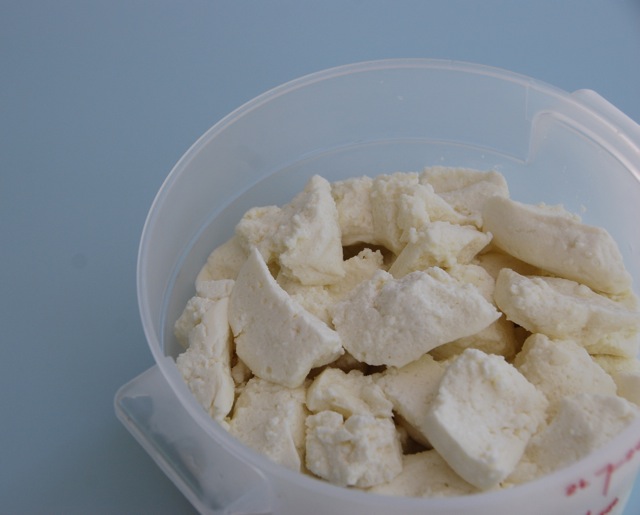
9. after 4 hours untie the cloth and cut the cheese into approximately one inch cubes by first slicing, and then cubing. i am not very particular about this because i like the rustic look of uneven cubes, and when eaten i usually crumble it. that said for the proper aging and salting you will want it to be somewhat uniform. in a container, place a layer of cheese cubes, sprinkle with salt, another layer of cheese cubes, sprinkle with salt etc. cover and place in refrigerator to age. cheese will be ready to eat in 4-5 days.
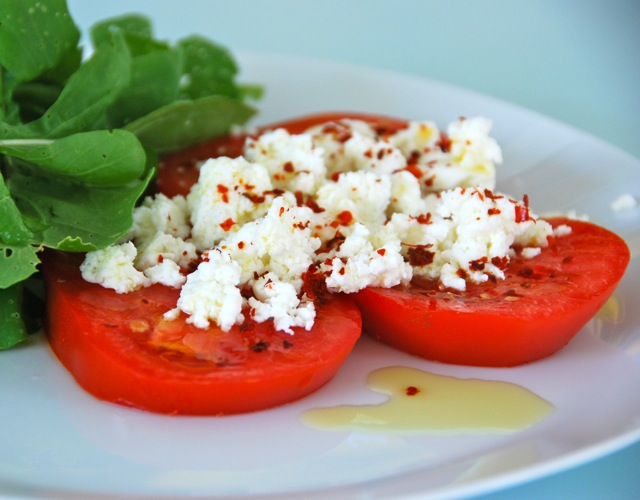
The possibilities for serving feta are endless: on tomatoes, in bean and grain dishes, on it’s own with a drizzle of olive oil and a sprinkling of black pepper & fresh herbs – take that and smash it all over a thick slice of country bread, or a just warmed pita. in all manner of salads, egg dishes, & veggies of every persuasion. and my personal fave – served with big hunks of fresh summer melon and a shot of ground chili pepper. i think i can honestly say –