Turning your culinary passion into a profitable business is an exciting journey. However, the gap between a home kitchen and a successful brand often comes down to presentation and preservation.
For food bloggers, home bakers, and culinary side-hustlers, mastering the art of packaging is non-negotiable. It is the invisible shield that protects your hard work from the moment it leaves your hands.
If you want to monetize your homemade goods successfully, you must look beyond the recipe. You need to adopt a strategic, professional approach to how your products are sealed, stored, and shipped.
Why Packaging Matters for Your Homemade Goods
When you sell a food product, you are selling an experience. Beautiful jars or artisanal bags might catch the eye, but functional packaging ensures the product actually tastes good when opened.
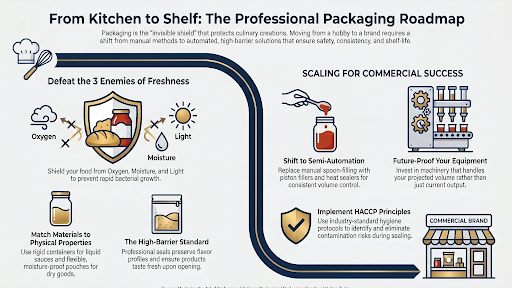
Good packaging is not just about aesthetics; it is the frontline defense against spoilage. Oxygen, moisture, and light are the natural enemies of fresh food, accelerating degradation and bacterial growth.
- Food Safety: Proper sealing prevents harmful contaminants from reaching your food.
- Freshness Retention: Airtight barriers lock in flavors, aromas, and essential moisture.
- Logistical Durability: Robust packaging withstands the bumps and drops of long-distance shipping.
Without a reliable packaging strategy, even the best homemade sauces or baked goods risk arriving spoiled, damaging your brand’s reputation instantly.
The Essentials of Choosing the Right Packaging Solution
Selecting the right packaging requires matching the material to the physical properties of your food. What works for a dry spice blend will fail miserably for a liquid marinade.
If you are packaging liquid sauces or pastes, you need rigid containers with high-barrier seals to prevent leaks. For dry goods and powders, flexible pouches with moisture-proof linings are highly recommended.
Automating this process is the fastest way to boost your kitchen’s output. Hand-sealing might work for your first dozen orders, but it quickly leads to inconsistencies and wasted time. (For more foundational advice on optimizing your workspace, check out our Kitchen Tips & Guides category.)
When your hobby outgrows your kitchen table, consistent packaging becomes a bottleneck. Maintaining airtight seals and precise volume control is essential to preserve the flavor profile of your products. Professional-grade custom packaging solutions of SANEU allow home entrepreneurs to achieve the same quality as industrial brands, ensuring your products stay fresh from the moment they are filled until they reach your customer’s hands.
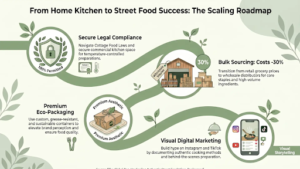
Scaling Up: From Home Kitchen to Small Batch Production
Transitioning from a passion project to a small-batch commercial enterprise requires a shift in mindset. You must evaluate your equipment and workflow for maximum efficiency.
Upgrading your setup usually means moving from manual spoon-filling to semi-automatic piston fillers or heat sealers. These tools drastically reduce human error and ensure every single unit meets your strict quality standards.
When planning your equipment upgrades, always consider your projected volume. It is often more cost-effective to invest in a machine that can handle your future capacity rather than your current output.
For entrepreneurs looking to expand their reach across borders, standardizing your production line is the first step. You can read more about taking your brand international in our guide to Scaling Your Global Culinary Creations.
Best Practices for Food Safety and Long-Term Storage
Scaling a food business means taking on a higher level of responsibility for consumer health. Adopting industry-standard hygiene protocols, such as HACCP (Hazard Analysis Critical Control Point) principles, is crucial.
These frameworks help you identify potential contamination risks during the filling and sealing phases. A clean environment, sterilized containers, and strict temperature controls are non-negotiable elements of commercial food production.
Regardless of your production scale, hygiene and preservation methods must always adhere to established safety guidelines. According to the FDA’s food safety regulations, proper sealing techniques are critical for preventing contamination and extending the shelf life of processed food products. Implementing these professional standards is the foundation of any successful food business.
Key Takeaways
| Area | Key Takeaway | Impact/Data |
| Materials | Match rigid/flexible materials to food state | Blocks oxygen, moisture, and leaks |
| Operations | Upgrade to semi-automatic sealers and fillers | Erases manual bottlenecks and inconsistencies |
| Compliance | Enforce HACCP and FDA hygiene protocols | Secures commercial shelf-life and safety |
| Risks | Avoid weak seals and overfilled containers | Prevents rapid oxidation and transit bursting |
Common Mistakes to Avoid in Food Preservation
Even ambitious food entrepreneurs make critical errors when first scaling up their packaging operations. Recognizing these pitfalls early will save you time, money, and customer complaints.
- Weak Seals: Relying on cheap, manual sealers often leaves micro-gaps, leading to rapid oxidation and spoilage.
- Wrong Material: Using porous bags for aromatic foods allows the flavor to escape and ambient odors to seep in.
- Overfilling Containers: Failing to leave sufficient headspace can cause seals to burst during transit due to pressure changes.
- Ignoring Labeling: Not providing clear storage instructions or expiration dates undermines consumer trust.
By investing in the right tools and treating your packaging process with the same care as your recipes, you secure the longevity of both your products and your business.