In an age of mass-produced convenience, the pursuit of authentic flavor has led many back to the fundamentals of gardening. Among the most rewarding and transformative crops for this journey is the humble potato. Homegrown organic potatoes offer a culinary revelation, with a depth of taste and texture that supermarket varieties simply cannot match. This endeavor is about reclaiming the essence of food. It is also about nurturing soil health and experiencing the unparalleled satisfaction of cultivating flavor from the ground up. The difference is profound, affecting the palate and the connection to what nourishes the body.
From Field to Flavor: The Lost Taste of Modern Potatoes
The flavor disparity begins long before the potato reaches the kitchen. Commercial potato farming typically prioritizes yield, uniform appearance, and long shelf life over taste. Varieties are selected for durability in transport and storage. Unfortunately, this is often at the expense of sugar content and complex carbohydrates that contribute to rich flavors. Furthermore, these potatoes are often harvested prematurely and treated with sprout inhibitors. These processes stunt their full flavor potential.
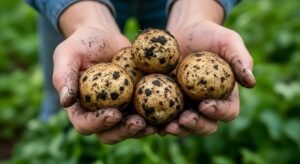
In contrast, a home gardener can select varieties specifically celebrated for their taste and allow them to reach full maturity in the soil. Here, their sugars and starches develop completely. Sourcing the right planting stock is the critical first step. For instance, using certified organic seed potatoes can ensure the process begins with healthy, chemical-free genetics aligned with organic principles from the very start.
The Foundation of Flavor: Living Soil
Superior flavor is inextricably linked to soil health. Organic gardening principles emphasize feeding the soil ecosystem. This, in turn, nourishes the plants. Healthy, biologically active soil teems with mycorrhizal fungi, bacteria, and earthworms. These organisms create a symbiotic relationship with plant roots. This dynamic environment can facilitate the uptake of a broad spectrum of minerals and nutrients. These directly influence the potato’s taste profile. Potatoes grown in chemically dependent soil typically have access only to a simplified, synthetic diet of nitrogen, phosphorus, and potassium.
While this may produce a larger tuber, it can result in a bland, watery one. Enriching garden beds with well-composted manure, leaf mold, and other organic matter can build a complex foundation. This living soil can impart a nuanced, earthy sweetness and a denser, more satisfying texture to the potatoes, as the plant draws from a richer palette of natural elements.
Cultivation Practices That Concentrate Taste
How potatoes are grown can significantly impact their final taste. Organic methods can naturally enhance flavor concentration. Consistent, deep watering can encourage steady growth and prevent stress that can cause hollow hearts or bitterness. Hilling soil around the growing stems serves multiple purposes. First, it protects developing tubers from sunlight exposure, which causes solanine production, resulting in greening and bitterness. Secondly, it encourages the plant to produce more tubers along the buried stem.
Crucially, for both early season potatoes and main crops, maintaining an organic farm environment forbids the use of synthetic herbicides and pesticides. It adheres to strict food safety guidelines. Under these conditions, the plants produce their own complex array of phytochemicals. This production is partly in response to natural environmental challenges. These compounds can contribute to each of the diverse potato varieties’ distinctive flavor and nutritional density. The absence of chemical sprays means the natural flavors of the potatoes remain untainted, pure, and true to their genetic heritage.
The Harvest and Curing: Locking in Quality
Flavor development doesn’t cease when the plant dies back. Proper post-harvest handling is essential. New potatoes, dug carefully while the plants are still slightly green, offer a tender, delicate flavor best enjoyed immediately. For storage varieties destined to provide months of culinary enjoyment, harvesting should occur on a dry day after the vines have completely died back.
After digging, potatoes must be cured in a dark, well-ventilated, moderately warm place (around 55-60°F) for 10-14 days. This process can thicken the skin, heal minor abrasions, and convert excess sugars to starches, which perfects the texture and flavor. Skipping this step can lead to rapid spoilage and a less refined taste. Proper curing, followed by storage in a cool, dark, and humid environment, can allow the flavors to mature and preserve their quality, extending the garden’s bounty well into winter.
A Culinary Revelation on the Plate
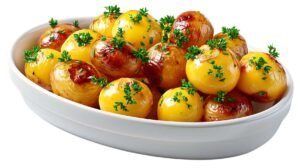
The ultimate test lies in the kitchen. A side-by-side comparison of a homegrown organic potato and a conventional store-bought one is revealing. The organic homegrown tuber typically has a firmer, creamier texture that holds together when cooked yet melts in the mouth. Its flavor, pronounced and earthy, carries distinct varietal characteristics. For example, enjoy the buttery richness of a Kennebec or the chestnut-like notes of a German Butterball. This intensity means they require less seasoning and fat to achieve delicious results.
Whether roasted until crispy, mashed to velvety perfection, or simply steamed with a touch of herbs, the potato itself becomes the star of the dish. Its superior quality can transform a simple side into the centerpiece of a meal, celebrating the clean, robust flavors that only nature, carefully nurtured, can provide. This culinary payoff justifies the extra effort in the garden. It proves that the most straightforward ingredients are typically the most extraordinary.
Beyond Flavor: Additional Benefits of the Homegrown Harvest
While flavor is a primary motivator, the benefits of growing organic potatoes extend far beyond the plate. This practice can foster a deeper understanding of seasonal cycles and plant biology. It can provide a degree of food security and self-sufficiency. Moreover, it reduces reliance on the industrial food system. Organic methods can promote biodiversity in the garden, supporting pollinators and beneficial insects.
Also, it ensures complete transparency as there’s absolute certainty about what substances, or lack thereof, have touched the food. The physical activity involved in gardening can contribute to personal well-being. Also, the harvest delivers nutrition in its most potent form, rich in vitamins, minerals, and antioxidants typically depleted in transported, stored produce.
Final Thoughts
Cultivating organic potatoes at home is an investment in flavor, health, and sustainability. It’s a practice that reconnects individuals with the seasonal rhythms of nature and the authentic taste of real food.
By keeping the information mentioned above in mind, individuals can ensure a deliberate move toward a more flavorful and fulfilling culinary experience. The result is a testament to the fact that the best flavors aren’t manufactured but cultivated with patience and care. The journey from a single seed potato to a forkful of exquisite taste is a powerful reminder that sometimes, the most profound discoveries are grown, not bought.


")