Stress physiology and female hormones are tightly linked. Cortisol shapes how you use glucose, how hungry you feel, and how ovaries communicate with the brain. That means steadying stress biology can help with cycle regularity, PCOS symptoms, perimenopausal discomforts, and energy swings. The goal is not to eliminate stress, but to restore healthy daily rhythms with a few measurable habits and targeted support.
The cortisol, insulin, and estrogen connection
Cortisol naturally peaks in the morning and tapers by night. When stress stays high, cortisol prompts higher blood glucose and can worsen insulin resistance. In women with PCOS, this matters because the condition affects an estimated 6 to 12 percent of women of reproductive age, and about 65 to 70 percent show insulin resistance even when body size is not very high. Insulin resistance can raise ovarian androgen output, fueling acne, hair changes, and irregular ovulation.
Perimenopause adds another layer. About 75 percent of women experience hot flashes or night sweats, and sleep disruption during this stage can push cortisol higher the next day, which may intensify cravings and mood symptoms. Across adulthood, about one third of U.S. adults get less than 7 hours of sleep, a pattern linked to higher insulin resistance and weight gain over time.
Sleep and circadian care that steadies hormones
Aim for a consistent 7 to 9 hours with the same wake time daily. Morning outdoor light helps anchor the cortisol awakening response, and dimmer light at night supports melatonin release. Caffeine has a half-life of roughly 5 to 6 hours, so keeping it to the morning can protect sleep onset and depth. Alcohol fragments sleep even at low doses, and each 10 grams of alcohol per day, roughly one drink, is associated with about a 7 to 10 percent higher breast cancer risk over time. Many women feel better using nonalcoholic options on weeknights; some reach for a calming ritual drink such as a Harmonia Cortisol cocktail in the evening.
Metabolic nutrition tactics that reduce hormonal noise
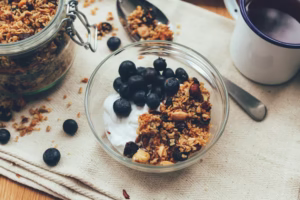
Protein and fiber stabilize glucose and reduce cortisol spikes from blood sugar swings. Most U.S. women average about 15 grams of fiber daily, short of the 25 grams recommended for adults. Building meals around vegetables, legumes, nuts, seeds, and intact whole grains closes that gap. Including 20 to 30 grams of protein per meal, from fish, eggs, soy foods, dairy, or legumes, supports satiety and lean mass, which improves insulin sensitivity.
Carbohydrates are not the enemy, but timing and structure matter. Pairing carbohydrates with protein and fat slows glucose rise, and many women notice steadier energy when a larger share of starch is placed earlier in the day rather than late at night. For women with high triglycerides, marine omega‑3s at clinically used doses can reduce triglycerides by roughly 15 to 30 percent, which supports cardiometabolic health during perimenopause and beyond.
Movement that lowers cortisol and improves insulin sensitivity
The U.S. recommendation is at least 150 minutes per week of moderate activity or 75 minutes of vigorous activity, plus muscle strengthening on two or more days weekly. Strength training is particularly helpful for women because more muscle increases glucose disposal and counters midlife metabolic slowdown.
Short bouts still matter. Light activity for 2 to 5 minutes after meals can improve post‑meal glucose compared with sitting. Gentle walking after dinner is often enough to reduce that drowsy spike and helps with digestion. If high intensity workouts raise your stress load, alternate them with low impact sessions to protect recovery and sleep.
PCOS specifics: break the stress‑insulin loop
Because insulin resistance is common in PCOS, small daily levers make a cumulative difference. Meeting fiber and protein targets, walking after meals, and consistent sleep often improve cycle regularity within a few months. Women with PCOS have higher rates of anxiety and depression than those without PCOS, so integrating stress management is not optional care, it is core treatment. If cycles stay absent for more than 3 months, or if you notice rapid hair growth on the face or significant scalp hair thinning, seek evaluation for androgen levels, thyroid function, prolactin, and metabolic markers.
Supplements with evidence, used thoughtfully
Myo‑inositol, alone or with D‑chiro‑inositol, has been shown to improve ovulation rates and reduce fasting insulin in PCOS. Magnesium intake is below the estimated requirement for about half of U.S. adults, and repletion can help with sleep quality and muscle relaxation; glycinate and citrate forms are typically well tolerated. Vitamin D sufficiency supports metabolic and ovarian function, particularly at higher latitudes with less winter sun. Discuss dosing and interactions with a clinician, especially if you use thyroid medication, SSRIs, or metformin.
Nervous system tools that actually move the needle
A daily 8 to 12 minute practice of slow diaphragmatic breathing or resonance breathing can improve heart rate variability within weeks, a sign of better stress resilience. Yoga and mindfulness programs reduce perceived stress and anxiety with measurable effects, and pairing them with regular daylight exposure amplifies benefits. If your mind races at night, a brief body scan or progressive muscle relaxation in bed can shorten time to fall asleep without medication.
When to seek more help
Irregular bleeding, severe hot flashes that persist, persistent low mood or anxiety, or signs of insulin resistance such as skin tags or darkened skin at the neck deserve medical attention. About one in three U.S. adults has prediabetes, and early detection allows prevention. Collaborative care with your primary clinician, gynecologist, or endocrinologist, paired with steady lifestyle practices, offers the most reliable path to calmer cortisol, steadier cycles, and sustainable energy.