The baking enthusiast will know how important a spatula can be to mixing and serving whilst anyone who has ever tried to scrape a burger off a grill without a spatula will know how much of a struggle food prep can be without one. What might surprise some people is that there are different types of spatulas for different purposes.
Whatever type you’re looking for, it can be hard to find a quality one that will last a long time, which is why we have created our list of the best spatulas on the market. Each one has a quality build, a great reputation and will flip a pancake or omelet with ease.
Quick Summary of Best Spatulas
Winco FST-6, Medium, Stainless Steel, Brown
Editor’s Choice
Ok, so it is marketed towards grilling and the edged end certainly makes creating indents and cutting at the grill easier but this is the sort of spatula that can be used for any purpose. The edge also makes it great for scooping and flipping pancakes so it can be used both in and outdoors.
A lot of people rate it highly which makes it one of the best performing and best value spatulas on the market since you can pick one up for less than $10. The smooth wooden handle feels comfortable to hold and the spatula as a whole has a nice weight to it. The spatula blade has a length of 6.5 inches so it is great for flipping just about any type of food with ease.
PROS:
- Great value
- Edged end for cutting
- Quality build
- Blade of 6.5 inches
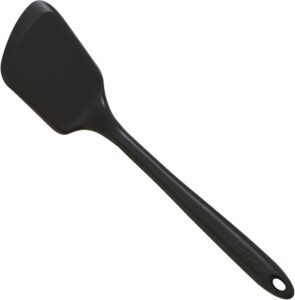
Di Oro Chef Series Standard Flexible Silicone Turner Spatula
Best For Eggs And Pancakes
The flexible silicone head of this quality spatula is BPA-free and allows you to get under your omelet without it breaking thanks to the thin edge. Another benefit of the head is that it wipes clean so if a bit of egg gets stuck, it isn’t going to require intense scrubbing.
The core is made from stainless steel so adds a layer of strength to the design and it is capable of withstanding heat of up to 600°F. The handle has a matte texture which makes it grippy, as well as a thumb indeed to make it easy to grip adding to the comfort and it even has a hanging hole at the top so you can store it. To top it all off, this impressive spatula comes with a forever warranty.
PROS:
- BPA-free materials
- Non-slip spatula
- Gets under eggs and pancakes with ease
- Easy to clean
CONS:
- Need to keep the handle away from the pan
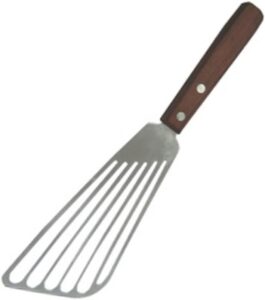
Victorinox Chef’s Slotted Fish Turner Head
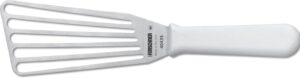

Marketed as a fish turner this product is one of the sturdiest we found which is no surprise when you see it is made by Victorinox. The head is large, giving you plenty of scope for turning larges pieces of fish of burgers on the grill and the handle is wooden with a comfortable feel.
The slotted design allows grease to drip when turning meaning it won’t scoop it. The head is made from high carbon stainless steel so you know the quality is there and it is sturdy enough to hold a large steak with no bending. A lot of professionals use this product and although it might not last in a restaurant kitchen, it is the sort of product that will be in the kitchen drawers of most homes for a long time.
PROS:
- High carbon stainless steel head
- Slotted design allows for drainage
- Comfortable handle
CONS:
- Handle can get a bit loose
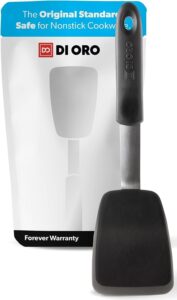
GIR: Get It Right Premium Silicone Spatula Turner
Best Affordable
Not only is this quality spatula heat resistant for up to 550°F but it has an incredibly thin edge to make it ideal for scooping under delicate food. The solid head means nothing will slip through the middle which also makes it easy to clean and hygienic as there is no debris left behind.
It is great for using with non-scratch proof cookware as the materials ensure it doesn’t leave its mark and it contains a fiberglass core that ensures it doesn’t get too hot to handle. This is no cheaply made plastic spatula which is reflected in their lifetime guarantee. They stand by the quality of the product. BPA-free it is made to last and comes in a variety of sizes so you can get it right.
PROS:
- Easy to clean
- Fiberglass core means it won’t get too hot
- Comes with a lifetime guarantee
CONS:
- Small so better for pancakes and eggs
OXO Good Grips Brushed Stainless Steel Turner
Best Value
On first impressions, this spatula might look simple but it is sturdily made and will last a long time. The brushed stainless steel means it can lean on hot cookware without melting but with a non-slip grip underneath on the handle, it is a comfortable product to use day in day out.
Although it has a slotted design, cleaning it is easy as it is dishwasher safe and with a hole in the top it can be stored easily. When you hold it this spatula certainly has the feel of a product that is almost impossible to break so expect it to be flipping your burgers and pancakes for years.
PROS:
- Sturdily built
- Non-slip handle
- Dishwasher safe
CONS:
- Might be too big for smaller hands
Rubbermaid Commercial Products High Heat Silicone Spatula
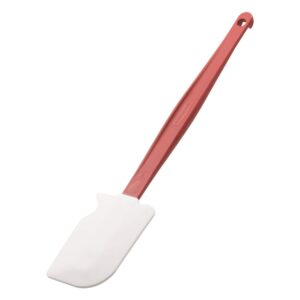
Best For Scraping
A lot of customers comment on the heat resistance of this silicone spatula and it is a favorite among baking enthusiasts thanks to its scraping ability but is also great for cooking. The blade is resistant to stains and because of its smooth materials, it will not scratch your cookware.
The handle is cool to touch at all times and the product is heat resistant up to 500°F. It is food safety approved and fine to go in the dishwasher so you can always clean it with ease. The blade features a notched end to use on scraping the sides of pans without the risk of scratching them and has a clean rest capability which keeps it off the kitchen top to prevent cross-contamination. A well thought out and sturdy spatula.
PROS:
- Blade is resistant to stains
- Dishwasher safe
- Notched end on the head scrapes the sides of pans without scratching
CONS:
- Head is not as big as some might like
Spatula Buyer’s Guide
It might seem like a simple kitchen utensil but up until now, you have probably been buying products that aren’t known for their longevity. This is why it is important to know what to expect from a quality spatula as the benefits can ensure it lasts a long time and makes flipping pancakes and eggs simple.
There are different types of spatulas so things can get confusing but we have created the following guide to help you find a product that is right for your needs and will last for many pancake mornings.
What To Look For In A Spatula
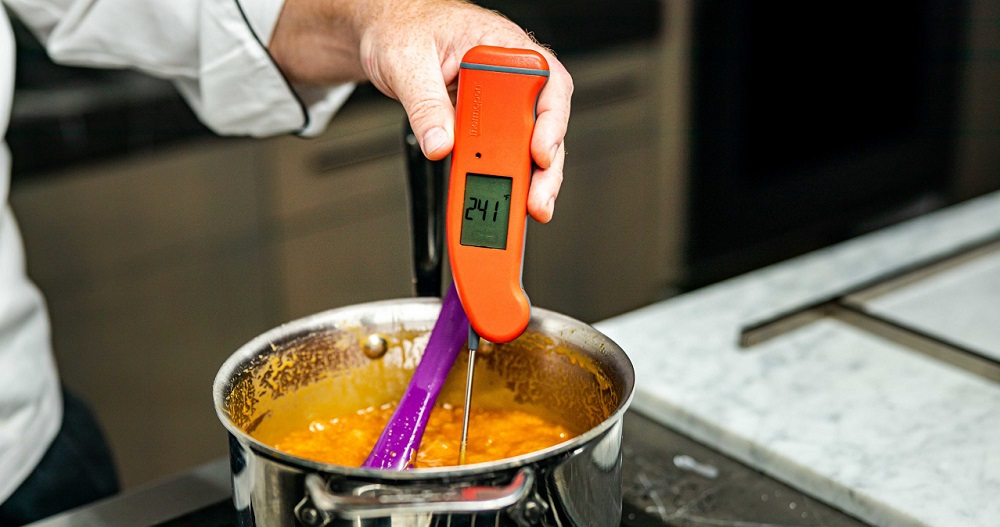
Heat Resistance
Most metal spatulas will be fine to use around a hot pan or grill, just be mindful if you leave it in the heat for a while when picking it back up. For plastic and silicone-based spatulas, be sure that it has enough heat resistance so it doesn’t melt as you use it to scoop or stir.
BPA Free Materials
With so many silicone spatulas on the market, you need to make sure it is made from food-grade materials that are BPA-free. Because it will come into contact with food, this is imperative.
Sturdy Head
If you’re lifting a six stack of pancakes you need to know that your spatula isn’t going to wilt and drop the contents on the floor. The better products will have enough give you make them flexible but be strong enough to carry the food you need it to.
Sharp Edge
Anyone who wants to get under a burger that is stuck to the grill or an omelet that needs to be turned urgently will appreciate a sharp edge. This allows the spatula to get underneath without having to keep readjusting.
Quality Materials
For heavy-duty use such as lifting and flipping burgers on a grill, you will likely want a metal fish spatula that has a strong handle and stainless steel head. Anyone wanting to flip an omelet or a pancake might prefer a silicone spatula because it will not scratch the pan.
Although you want your spatula to be made from sturdy materials you still need to be sure that they are well suited to your pans. A stainless steel head might be great for using on the grill but they can scratch pans if used robustly.
A Reputable Brand
This is important when it comes to cooking as you want a genuine product that is made from safe materials. This is more likely to be the case when you use a product from a reputable brand and they also tend to give a money-back guarantee or something to protect your purchase.
Dishwasher Safe
This isn’t always a deal-breaker but it can be important for keeping your spatula bacteria-free and clean. Certain products clean up better than others after a wash and check that it is suitable to wash this way before you put it in your dishwasher.
Head Size
Depending on what you are using it for, a spatulas head is an important consideration. Anyone looking to flip an omelet will need something with a wide enough head to accommodate the width without causing it to break in half.
Different Types of Spatula
Although there are several types of spatula that you can split into different categories, here are the main ones:
Metal Fish Spatula – Despite the name, these can be used for a variety of foods and are popular at the BBQ grill. Because of the sharp edge, it can scoop food that is stuck to the grill or pan and has a slotted head to allow drips to fall. This is also what helps to keep the food from sliding off the head and expect a sturdy handle so it can hold heavier items.
Silicone Coated Spatula – Sometimes these are made of plastic but the better ones favor silicon because it is heat resistant. They are handy because they do not scratch cookware, ideal if you don’t have nonstick pans. Also available in high-heat versions and good for baking as you can scrape the sides of a cake mix with ease.
Metal Turner – Popular for using with meats because they can push burgers down with a strong head to ensure everything is cooked well and for lifting stubborn foods from an oven tray.
Offset Spatula – A specialist, long and thin spatula that is a handy utensil for baking as it is used to evenly spread frosting over a cake.
Different Materials Used For Spatulas
We’ve discussed the main types now it’s time for a closer look at the common materials used in spatulas.
Metal – Although they are heavier, this adds to their durability and you will find it a hard task to break a decent metal spatula. Typically used around the grill they are perfect for frying or grilling fish, meat, and vegetables.
Silicone – These are becoming more and more popular as they are made to resist heat at high temperatures and are good for avoiding scratches on your pans. Some silicone spatulas are great for scraping mixtures when cooking and do not stain easily.
Plastic – As with many plastic products, these spatulas are more affordable but you do have to compromise on quality. They tend to melt when exposed to high temperatures and can peel at the tip before too long.
Wood – Good for use with non-stick pans because much like silicone, they do not scratch surfaces. They are fine with the heat but tend to stain and spoil and need a thorough clean to keep them hygienic.
Key Takeaways
There is no need for you to use a cheap, poorly made spatula, especially since there are some great affordable options available. Any of the above will be an excellent addition to your meal prep and will be sure to flip pancakes and burgers for a long time.
When you feel the sturdiness of a well-built product, you’ll never want to go back to a flimsy product that makes cooking awkward. Go for something that deserves to be in your kitchen.