Regardless of whether you’re grilling some burgers, steaks or pork steaks, you’re going to need a few barbecuing tools. These tools include a grill, some charcoal or propane, and the best grill brush for keeping the grill in good working condition. Actually, now that we think about it, the brush is probably the most important consideration of all. A lot of people spend a ton of time agonizing over the type of grill or charcoal they buy, but then put in absolutely no thought in choosing a brush for cleaning their grill. We’re going to solve that problem by taking a few minutes to talk about this very subject. So, if you’re a fan of BBQ, you are probably going to want to join us.
List of the Best Grill Brushes
- Best Overall: Grill Art 18-Inch Stainless-Steel Safe-Wire Brush (Amazon) – Review
- Best Bristle-Free: Grillaholics Bristle-Free Grill Brush (Amazon) – Review
- Best Durable: Kona Safe Bristle-Free BBQ Brush (Amazon) – Review
- Best Affordable: Weber 12-Inch Wire Grill Brush (Amazon) – Review
Best Overall: Grill Art 18-Inch Stainless-Steel Safe-Wire Brush
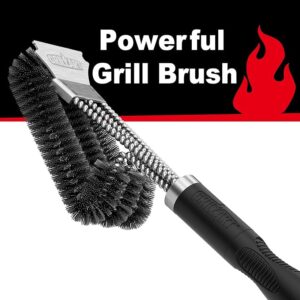
The problem with the grill brushes of the past was that the steel bristles would end up coming out of the brush, which allowed the stray bristle to stick to the grill and perhaps end up in the consumer’s food. And this was a disastrous situation because if a person ingests the steel bristles of a brush, it could end up puncturing their stomach or intestinal walls. Fortunately, this grill brush helps solve that problem by having a more thoughtful design. These brushes are designed with the steel wire that’s tightly woven and embedded into a twisted steel pipe to prevent it from losing the bristles as the brush is being used.
Of course, designing this brush in this way not only makes it safer to use, but it also makes it more durable and we’ve found these brushes tend to outlast just about any other brush for the grill out there. These brushes are 18-inches long, so they help to keep the user’s hands away from the heat as they’re cleaning their grill. And because these brushes are made from quality components, they won’t bend or rust. This brush even includes a stainless steel scraper at the end of it that you can use to plow down burnt-on grill messes. And because the handle has a quality hanging hook on it, it’s easy to put away and store between uses.
Best Bristle-Free: Grillaholics Bristle-Free Grill Brush
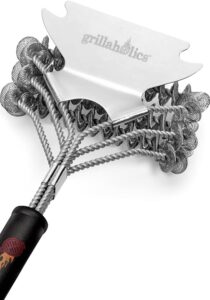
Grill masters who are concerned about using a grill brush equipped with nylon or steel bristles may want to check out this tool. This brush does not have bristles at all, and instead uses stainless steel coils to remove messes on the grill. Since it has no bristles at all, there’s no chance that any will end up on the grill and ultimately, in the food. At the end of its tip, this model has a scraper that you can use to quite effectively remove burnt-on messes. This design allows the brush to clean three times faster than comparable lesser quality brushes.
This brush has an 18-inch handle that helps keep you away from the heat of the grill. It also gives you the leverage you need to clean the grill effectively. This grill brush includes heavy-duty components that allow you to use it for years on end without it falling apart. Of course, all of this means that because they use higher quality components to build the brush, it’s a little bit more expensive than other models. In our opinion, it’s worth the added costs, however, because you won’t have to continually buy new brushes.
Best Durable: Kona Safe Bristle-Free BBQ Brush
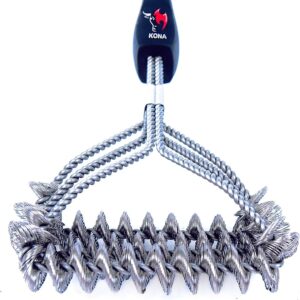
As most of our readers know by now, we try to avoid grill brushes that use bristles. That’s because we think that bristle-free brushes are inherently safer than brushes with grills. And it’s why we’ve chosen this Kona grill brush for this position on our list. This is a model that’s made without wire bristles and is instead made with a rigid construction that cleans grill effectively. And because it’s stainless steel, these brushes won’t melt like nylon brushes. This brush is made to such exacting standards that it’s even backed by a 5-year warranty from the manufacturer.
This brush has a 3-in-1 design that allows it to be used in several ways so you can clean a variety of different grills. You can use this brush on porcelain or stainless steel grills, and it comes with a weather-resistant handle. Because the handle is 18-inches long, the consumer can also use this brush without having to be close to the heat. Keeping all of this in mind, it’s easy to see how this brush can be an effective tool for keeping a grill clean during the BBQ season. And since it has a convenient loop on the end of it, you can easily hang it up between uses.
Best Affordable: Weber 12-Inch Wire Grill Brush
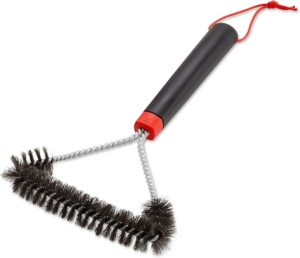
Anyone reading this list can see that this brush is a little bit different than other brushes we have reviewed. That’s because this is a budget model for those who don’t want to spend a lot of money on a grill brush. This grill brush is made with steel bristles that we’re not typically fond of, but are at least well-made so they’re less likely to fall off than other steel bristle models. It also has a wide head that covers a larger grill surface area and seems to do very well at resisting wear. And because it has shorter sides, you can easily use this brush to clean around a grill’s edges or remove debris that may have accumulated between the grill’s grates.
This brush also has a quality weather-resistant handle, although we really didn’t like the fact that it was only 12-inches long and not 18-inches. The smaller handle size means that the consumer is not only closer to the grill’s heat, but they have less leverage when they’re scrubbing the grill down. However, we can say that the handle did have an ergonomic design that is easy to hold. All of this simply means that while this might not be our preferred grill brush for cleaning a BBQ grill, it is a good budget one that some people may like to use.
The Griller’s Guide To Grill Brushes
Since we understand that people need to find the best grill brushes, they can find and need to find a model that’s not only easy to use, but also safe and effective, we decided to write this little guide on the subject. In the depths of our guide, our readers will find the tips and tricks to not only buy the best brush for cleaning grills but also learn how to use that tool effectively.

How To Choose a Grill Brush
Most people don’t give a lot of thought to the grill brushes they choose. They just pick one up that they think will do a good job and don’t give a second thought to what the brush is made from or how it’s designed. To help our readers put a little bit more thought into their brush purchases, we decided to write this section that outlines some of the design specifics every consumer should consider before they buy their next grill brush.
Bristle Or Bristle-Free Designs?
The first thing that we implore our readers to consider is what the end of the brush is made from. This is the part of the brush that comes in contact with the grill, so it’s probably the most important part to consider. Ideally, the consumer is going to want to make sure that they buy a brush that has a stiff surface that can really scrub away burnt-on messes and cooked on BBQ messes. However, it’s also important to consider whether the brush uses steel or nylon bristles or has a bristle free design.
In our opinion, choose a brush with a bristle-free design is probably the best. That’s because traditional grill brushes would “shed” their bristles, which would then get stuck on the grill. These bristles would then sometimes get stuck in food, resulting in some harm to the person consuming them. Once these bristles are inside of a person, the bristles can puncture the intestinal tract, or the stomach, and often people who ingest them require surgery. Not a good situation at all.
There are plenty of grill brushes that have a bristle-free design and we’ve listed some of the ones we like. These are safer to use and less likely to cause problems than traditional brushes. However, we do understand that some people prefer brushes with bristles, so if the consumer has to buy one of these, they should make sure that they clean their grill off with a paper towel after each use just to be safe.
Consider A Model With A Scraper
It’s also a good idea for the consumer to choose a brush that has scraper on the end of it. A scraper will allow the consumer to get off carbon build-up and burnt on meat particles that the wire part of the brush can’t remove. It’s also a great way to remove particles between the BBQ grates or around the corners of the grill, so consumers should think about making sure their new grill brush has one of them equipped.
Consider The Scraper’s Handle
The next thing to seriously think about is grill brushes’ handle. Ideally, the consumer is going to want to choose a grill brush with at least an 18-inch handle. That size is perfect for not only giving the user the leverage they need to scrub away tough burnt-on particles off of the grill’s surface but is also long enough to keep the consumer away from the heat of the grill.
Additional Grill Brush Tips
To end our guide on grill brushes, we decided that it would be a good idea to list some additional tips/tricks that you can follow to keep your grill as clean as possible. After all, a cleaner grill not only cooks food better, but it also prevents nasty carbon particles from ending up in the food. So, let’s learn a few things that you can do to keep your brush and grill in good condition.
- Read the grill’s instructions and buy the appropriate brush for that grill.
- Use a bristle-free brush when possible.
- Inspect the grill brush on a regular basis and discard it when it wears out.
- Never use a wire brush if the bristles are loose.
- When using a wire brush, make sure to thoroughly wipe down the grill with a paper towel afterward.
- Always do a visual inspection of the grill before use to make sure there aren’t any wire bristles.