Home Blog Page 60

A classic recipe for Holiday Eggnog

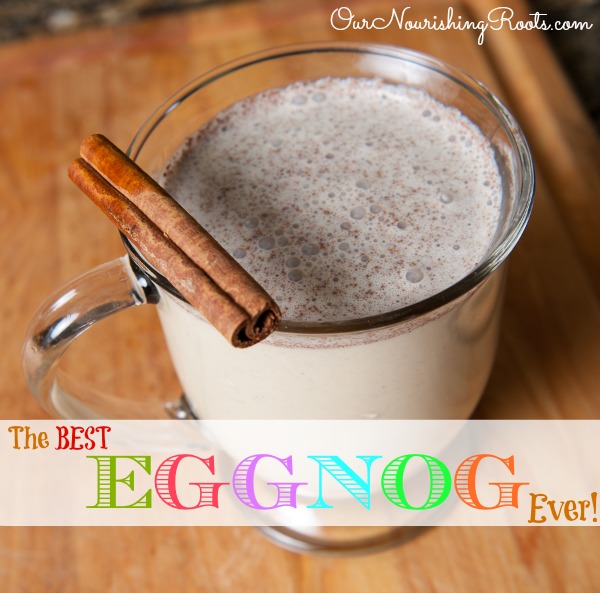
Eggnog is the king of holiday beverages, and I will not let anyone tell me otherwise. Over the years I have perfected my homemade eggnog recipe and today, I want to share it with you!

Eggnog

The key to a good eggnog is using quality ingredients. For me, that means the usual: whole milk and grass-fed cream instead of artificial thickeners, egg yolks that did not come from a factory farm, and some natural sweetener in the form of raw honey. Add a few pinches of holiday spices and you have the perfect drink! I specially don’t include egg whites because these are better eaten cooked (the enzyme inhibitors are not lost that way).

My recipe has been tested multiple times, and I am confident you will find it just as delicious as me and my family do. It’s very quick too! Blending all the ingredients together in a blender takes seconds and we get to enjoy this holiday beverage almost immediately!

I have also tried replacing eggnog with Silknog a few years ago and I must say that I didn’t hate it. This eggnog-flavored soy milk had a thinner consistency but still tasted very holiday-like. However, then I found out that soy isn’t that healthy after all. It has a very high phytic acid content so the only way it should be consumed is properly fermented. So natto, naturally fermented soy sauce, and fermented miso paste are good but the Silknog? Not so much. That’s when I returned to making my own homemade eggnog and I haven’t looked back ever since.

And as a side note, I love this recipe for how versatile it is! Whenever I have some eggnog leftover, I put some of it in ice cube trays and freeze it overnight. Then I have the perfect eggnog creamer for my morning coffee! You can also turn it into eggnog-flavored ice cream if you have an ice cream maker. Or add a few cups of ice to make an eggnog smoothie. The choice is yours!

Necessary equipment:

  • a high-power blender
  • serving glasses

Ingredients:

  • 2 cups of whole milk
  • 2 cups of grass-fed cream
  • 8 egg yolks
  • 4 T. of raw honey or maple syrup
  • 1 1/2 T. of vanilla extract
  • 1 1/2 t. of ground cinnamon
  • 1 t. of ground nutmeg
  • 1/8 t. of ground allspice
  • 1/8 t. of ground cloves
  • a pinch of sea salt
  • optional: bourbon/rum/cognac to taste

Extra: If you want to make this recipe dairy-free, you can replace both the milk and cream with 4 cups of coconut milk. Do the same if you are on a GAPS diet. Also, if you are on GAPS, use honey instead of maple syrup.

Instructions:

  1. Put all of the ingredients in a blender and combine on medium high until fully combined.
  2. Pour into serving glasses.
  3. Garnish with a pinch of fresh nutmeg and add a stick of cinnamon for stirring.

Enjoy! And if you want spiked eggnog, I just happen to have the recipe for you.

How to Make Homemade Pasta

As you probably know already, I love making things from scratch. Not only foods but also cosmetics, oil blends, simple decorations, et cetera. But in this post, we will be talking about food. Specifically, pasta!

Homemade Pasta

Making your own pasta seems like a big hassle but it doesn’t need to be. My recipe is fairly straightforward and doesn’t take up that much of your time. Once you cook up your own pasta a few times, like me, you will be done in a couple of minutes!

The image of the process of pasta being difficult probably stems from the fact that when we see people make pasta on TV’s culinary shows, they usually use special pasta-making equipment, like a pasta roller. But the truth is that you don’t need to necessarily use these machines! You obviously can, and it will probably make your job even easier, but I have successfully made pasta using only a rolling pin to flatten the dough and a pizza cutter to cut out the pasta shape. Heck, you don’t even need a pizza cutter, you can just use a regular knife.

Why Homemade Pasta?

There is absolutely no comparison between store-bought pasta and the homemade version. And the satisfaction that you get from making something with your own two hands is unbeatable.

Pasta Dish

I prepared two separate pasta recipes for you today. The first one is very quick. It uses eggs which I think makes the pasta texture more tender. You just prepare the dough, flatten eat, cut the pasta into your desired shape, boil it, and voila – you’re done! You can even add fresh herbs to the dough to make it even more interesting. This pasta is best served immediately.

The other one is made using soaked flour which means that you need to start the preparations a day before. But in return, your pasta will be easier to digest and have more nutritional value. I feel that it’s also better for making pasta for later use. You can easily dry it and it will hold for several weeks. That’s why I usually make in large batches once a few months.

Necessary equipment:

  • a large mixing bowl
  • a kitchen towel
  • optional: a large dehydrator
  • a rolling pin
  • a pizza cutter OR a pastry scraper OR a sharp knife
  • optional: cooling racks (for drying the pasta)

Homemade Egg Pasta

Ingredients:

Instructions:

  1. Pour the flour into a large mixing bowl. Make a well in the center with your finger.
  2. Crack all the eggs and put them in the well you just made.
  3. Gently knead the flour with your hands, starting from the center where the eggs are. Knead until both ingredients fully combine and the surface of the dough is smooth.
  4. Press the dough with your hands to make roughly a rectangular shape.
  5. Use a rolling pin to flatten it further to about 1/8 inch thickness.
  6. Use your cutting tool to cut the dough into any shape you want. Try to be consistent with the size of each piece so that they boil evenly.
  7. Put the fresh pasta in salted boiling water and cook for 3 to 5 minutes or until the pasta becomes slightly tender.
  8. Serve immediately.

Homemade Soaked Pasta

Ingredients:

Instructions:

  1. Pour the flour into a large mixing bowl. Make a well in the center with your finger.
  2. Pour in the warm water and the apple cider vinegar.
  3. Gently knead the flour with your hands, starting from the center. Knead until both ingredients fully combine and the surface of the dough is smooth.
  4. Cover the bowl with a kitchen towel and leave at room temperature overnight (at least 12 hours).
  5. Remove the dough and put it on a counter lightly sprinkled with flour. Knead for one minute.
  6. Press the dough with your hands to make roughly a rectangular shape.
  7. Use a rolling pin to flatten it further to about 1/8 inch thickness.
  8. Use your cutting tool to cut the dough into any shape you want. Try to be consistent with the size of each piece so that they boil evenly.
  9. You can dry the pasta two ways: leave them as they are on the floured counter (takes more time) or transfer them onto a cooling rack.
  10. When the pasta dries and completely hardens, transfer it to an airtight container and keep in the pantry.
  11. Use within several weeks.

For another great pasta recipe, try my ricotta spinach pasta.

Golden Birthday Yellow Butter Cake

Yellow butter cake

Do you celebrate golden birthdays at your homes? I sure do! A golden birthday is when you become the same age as your birthday. So, for example, if I was born on May 1st, my golden birthday would be celebrated when I was 1 year old.

It was my mom who sold me to the idea by making sure my golden birthday was celebrated in style.

But anyway, this year is my first son’s golden birthday! And because a golden birthday is no ordinary birthday, it deserves a little extra magic. For our backyard party with his friends, I’m putting up gold decorations and adding a few fun touches. I’ll wrap the gifts in golden wrapping paper, use golden straws for the drinks (“gold” lemonade), and even include custom deli paper for serving the snacks to match the theme. I will leave chocolate coins wrapped in gold foil for the kids to search for as part of our little treasure hunt tradition.

But what I hope is going to be the most exciting is the golden cake I plan to bake for my son! The golden cake is going to be a traditional yellow butter cake with some golden buttercream icing on top.

I prepared this cake last week, as a practice cake. It turned out so good that I just had to share the recipe with you. As usual, it’s made of homemade sprouting flour, nourishing grass-fed butter, organic eggs, and sweetened with raw honey and whole cane sugar. There is nothing artificial about this cake! It’s made from scratch to ensure that my son and his guests won’t be suffering from any digestion problems that would ruin the fun they will be having.

Necessary equipment:

  • measuring cups
  • two large mixing bowls
  • wooden spoon OR a whisk
  • kitchen towel
  • optional: a dehydrator
  • cake pan (or two pans)*
  • parchment paper
  • scissors
  • pen OR pencil
  • hand mixer OR a stand mixer
  • cooling racks
  • cake server OR a rotating cake plate for serving

*You can use one cake pan and pour all of the batter into it at once and then, once the cake is done, cut the cake into two even halves. I find that hard to do without specialized tools so I usually bake two separate cakes from half of the batter each.

Ingredients:

Yellow Buttermilk Cake

for soaking the night before:

for next day:

  • 1 cup (2 sticks) of grass-fed butter
  • 4 large eggs from pastured chickens
  • 2 large egg yolks from pastured chickens
  • 1 1/4 cup of raw honey
  • 1/4 cup of whole cane sugar (best if it’s coconut sugar because the color won’t stand out in the batter)
  • 2 t. of baking soda
  • 2 t. of baking powder
  • 1 T. of vanilla extract
  • 1 t. of sea salt

all ingredients should be at room temperature so that the batter will come together with no lumps

Instructions:

  1. Combine the flour and the buttermilk in a large mixing bowl. Cover with a kitchen towel and leave overnight in a warm place. I usually use a dehydrator but you can also just put the bowl in an oven with the light turned on.
  2. The next day, prepare your cake pans. Lay a piece of parchment on the circle bottom of the cake pan and use a pen or pencil to trace the shape of it. Cut out the circle using scissors but make sure you cut just below where the pen or pencil markings are so that you don’t get any of them in your cake. The cutout shape should be the perfect fit for your cake pan. Now butter the cake pan so that the parchment paper circle will stick to it. Butter the top side of the parchment paper as well. Your cake pan is now ready for action!
  3. Preheat the oven to 350 degrees.
  4. In another large bowl, use a mixer to combine butter, raw honey, and whole cane sugar. Keep mixing until the mixture is fluffy and soft.
  5. Gradually add in the soaked flour with buttermilk and mix it in.
  6. Add in the baking powder, baking soda, and sea salt. Mix to combine.
  7. Add eggs, the two extra yolks, and vanilla extract. Mix to combine.
  8. Pour the batter into your prepared cake pans.
  9. Put the filled cake pans onto the counter sharply a few times. This way, you will get rid of any bubbles that might be in the batter.
  10. Bake for 35 to 40 minutes. You will know your cake is ready when it turns golden brown and is set in the middle.
  11. Leave to cool completely on the cooling racks.
  12. Use a butter knife to loosen the cake from the sides of the pan. Carefully get the cake out of the pan.

Golden Buttercream Frosting

Ingredients:

Instructions:

  1. Beat the butter and the honey together in a large bowl using a mixer with a whisk attachment.
  2. Add in the vanilla extract, sea salt, and optionally the yellow food coloring. Beat until the mixture turns fluffy.
  3. Use immediately to frost the cake. Set one cake layer on a cake plate and cover it with the buttercream frosting. Set the second layer on top.
  4. Cover all the sides of the cake with frosting. Smooth it down using a spatula or add some swirls here and there if you are feeling creative. Clean the sides of the cake plate with a towel.
  5. Put any decorations on the cake, like candles or edible flowers.
  6. Chill for at least half an hour before serving.
  7. Try to cut the cake while it’s still chilled so that the frosting won’t lose its shape.

Enjoy this delicious golden birthday cake!

Mahi Mahi with Almond Crust

I’ll be the first one to admit that I don’t get enough seafood in my diet. This is something I am actively working on as I try to gain the courage to cook fish for my family. I don’t know about you but I find cooking and seasoning fish a bit intimidating. I never really learned how to do it since my mom never cooked fish and it’s not like I grew up somewhere with a good supply of fresh seafood.

But I know that we should all be eating plenty of fish because their nutritional value is simply off the charts. They are full of healthy omega 3 fatty acids and vitamin D, vitamin B, and other minerals. And it’s also a great source of protein and amino acids that I sometimes fear we don’t get enough of. Amino acids are very important for brain function and mental health. I always try to get as many amino acids in my kids as I can so that they won’t suffer from depression like I used to.

But I also know that we need to be careful with what kind of fish we buy. I am not talking about particular species but rather the way they were raised. Big commercial fish farms often use grains to feed the fish and make them grow big but that’s not really what we want in the fish we buy for dinner. So, I always try to buy wild-caught fish that weren’t raised in an artificial environment.

Mahi Mahi

Mahi mahi is one of the easiest to find fish in my local area. I usually buy it from nearby health food stores, and they are available for most of the year. It’s relatively easy to prepare and to eat due to how soft it gets when cooked. It’s one of the few fish species that I feel confident in cooking! Butter gives this dish a nice creamy flavor that contrasts well with the refreshing lemon. The almond crust on top turns crispy and completes the whole dish.

I use my own homemade version of the Emeril’s Essence Spice Blend. It’s a commonly used spice blend in my kitchen that works well with fish and most meats.

Ingredients:

  • 2 1/2 T. of powdered paprika
  • 2 T. of garlic powder
  • 2 T. of sea salt
  • 1 T. of cayenne pepper
  • 1 T. of black pepper
  • 1 T. of onion powder
  • 1 T. of dried thyme
  • 1 T. of dried oregano

I just put all the spices together in a small glass jar and shake vigorously so that they combine well. I feel like this is one of the nicest general spice blends that can be utilized in many different ways.

Now onto the mahi mahi recipe!

Necessary equipment:

  • a small mixing bowl
  • a whisk
  • a large mixing bowl
  • a wooden spoon
  • a baking dish

Ingredients:

  • 4 filets of wild-caught mahi mahi
  • 2 cups of almond flour
  • 1/2 cup (1 stick) of melted grass-fed butter
  • 2 t. of sea salt
  • 1 t. of ground black pepper
  • zest of one lemon
  • juice of one lemon
  • homemade Emeril’s Essence Spice Blend to taste

Instructions:

  1. Preheat the oven to 350 degrees.
  2. Combine the melted butter with lemon zest and lemon juice in a small mixing bowl using a whisk. Set aside for now.
  3. In a larger mixing bowl, combine the almond flour with salt and pepper using a wooden spoon. Set aside for now.
  4. Wash the fillets with fresh water and pat dry.
  5. Dip each fillet in the butter mixture first and then cover with the almond flour mixture. Put the prepared fillets in a baking dish.
  6. Pout the leftover butter mixture over the fillets.
  7. Sprinkle the fillets with a large dose of Emeril’s Essence Spice Blend (I usually use at least 2 teaspoons per fillet).
  8. Bake for 25 minutes. You will know the dish is done when the almond crust is crispy and the fish underneath is done.
  9. Serve with halved lemons so that you can squeeze out the juice just before eating.

Enjoy! For a quick seafood recipe, try my baby spinach salmon sandwich.

How my Son’s Cleft Lip Helped me Embrace Real Food

I want to get a bit more personal today. I want to talk about how clean eating habits have helped me overcome one of the most difficult periods of my life.

We faced a myriad of problems when I was pregnant with my second son. At the 20 week ultrasound, the doctors discovered a cleft lip. Other specialists were called in and other abnormalities were found. I was heart-broken.

We still didn’t know the full extend of my son’s health problems. Many tests were done and we were told to wait for results. In the end, that took around three weeks total. I felt like a wreck during those three weeks. I hardly ever slept and was in no condition to look after my older son. We sent him away to live with his grandma for a while because I didn’t want him to see me like this. I knew he would just ask questions and I did what I could to avoid answering them.

I tried to take my mind off the pregnancy with other things. First, I started yoga. It helped albeit not that much because my stress levels were simply off the charts. I watched mindless movies on TV and read addictive books that would hopefully transport me to another world in which I didn’t have to face my problems.

gap

Fortunately, none of our worst fears came true. We still had some issues to figure out but the most important thing was we knew our son would be able to live a happy life if there were no unforeseen complications. The first thing that had to be taken care after I gave birth was the cleft lip. At two months old, a wonderful team of doctors performed surgery to fix the unilateral cleft lip. They did the same to fix the palate eight months later. There were no complications for which I am forever grateful.

But ever since I was first left waiting on the test results during the pregnancy, I had that thought in the back of my mind: “what can I do to help?”. I am not a doctor, I often had no idea what was going on to be honest. But because my son was growing in my body, I felt like I needed to start working on making myself as healthy as possible. For his sake. My son’s health drove me to become committed to eating clean.

gap

I was already familiar with some principles of eating for health since I had been reading on Nourishing Traditions from even before I had become pregnant with my second son. I’ll admit I knew some things but I was nowhere near the level I am currently at. I had no idea what raw milk was and how fermented cod liver oil supplements worked. But I read and read various research papers that would prove what I think I knew inherently already: that the traditional diet of our ancestors is the healthiest one and it would benefit us all if we were to go back to it.

After those three dreadful weeks of waiting, I spent most of my time in the kitchen. I experimented with new recipes to see what works for me and what doesn’t. In search of grass-fed dairy products, I contacted some local farmers. I joined a co-op that provided me (and still does) with all kinds of GMO and pesticides-free fruit and vegetables. I learned how to ferment foods and how to make sprouted flour on my own.

gap

Doing all of that not only made me feel better but it also kept me from worrying too much about what other potential health problems lay in my son’s future. I truly believe that if it weren’t for my “obsession” (a healthy obsession) with nutrition, I would spiral into a pit of hopelessness and self-despair.

I continue to do the same although I had much less free time. For the first year of my son’s life, I feel like all I did was cook, pump breast milk, watch over my kids, and go to physical therapy for torticollis (a condition where the neck muscles cause the head to tilt or turn to one side).

But what really solidified my commitment was not my improved well-being. It was the smile on my second son’s face as he eats his soaked oatmeal with raw milk for breakfast or reaches for an apple instead of a candy bar. I am no doctor but I know that I am doing everything I can to help him overcome his health issues. And even if it takes me a bit more time than if I were to rely on store-bought products, I have no regrets. That smile of his makes it worth it for me.

GAPS-friendly Honey Lemonade

I was gifted five pounds of organic lemons out of the blue last weekend and that means I spent the whole week trying out different lemon recipes because no food goes to waste at my house.

Honey Lemonade

One of the recipes I attempted was this really simple honey lemonade. I love lemonade but I rarely make it myself because it always seemed so time-consuming to me. But I couldn’t be more wrong!

The combination of acidic lemons and sweet honey works surprisingly well together and it’s a perfect drink that is both refreshing and cozily sweet at the same time. All it takes to make one large batch of this lemonade is one cup of fresh lemon juice. The recipe is very simple and I’m going to share it with you in a minute.

But first I want to mention what I did with all the other lemons. After all, using up all five pounds of them is not a possible task in a home environment. My solution is to squeeze all of the juice out, zest everything that can be zested, and put the results in the freezer for future use.

I use ice cube trays to freeze lemon juice. Just put some juice in the tray, let it freeze, take the cubes out and transfer them to a separate container, and you have the ice cube tray back to yourself!

The zest is a little bit trickier. I usually transfer it to miniscule freezer bags or freezer-friendly container. I keep them separated in small amounts so that I can easily take and de-freeze only the amount I need for the recipe I’m making.

Ok, let’s get on with the recipe for honey-sweetened lemonade! P.S. lemon isn’t really friendly for beginners of the GAPS diet but in this recipe, it’s heavily diluted with water so I think it should be fine for most people.

Necessary equipment:

  • a citrus juice
  • a sharp knife
  • a large mixing bowl
  • a whisk
  • a wooden spoon
  • a glass pitcher

Ingredients:

  • 2 quartz of freshly filtered water
  • 1 cup of lemon juice
  • ½ cup of raw organic honey
  • a pinch of sea salt

Instructions:

  1. Combine the water, lemon juice, and honey in a large mixing bowl. Whisk vigorously until you completely dissolve the honey.
  2. Pour your mixture into the pitcher.
  3. Add a pinch of salt and stir with a wooden spoon.
  4. Optional: Feel free to garnish with mint or add some ice cubes if your goal is to quench that summer thirst.

Enjoy this delicious lemonade! Next time, try my spicy and sweet ginger lemonade.

Simple but Delicious Tomato Basil Soup

Tomato Basil Soup

I believe soup is the ultimate comfort food. It’s perfect for when you are sick and can hardly digest anything else and it’s also perfect for warming up during the colder months. In winter, I absolutely love ending my day with a bowl of steaming hot soup. It warms my body up and helps me relax before going to bed. And you can make a large batch of it at once so that you have enough to last you the whole week!

I love soups but it wasn’t always that way. When I was younger my mother would often serve us canned soup for dinner because she was working hard and didn’t have much time left over for cooking us full course meals. And the canned soup was, and still is, a heavily utilized option for many of those who don’t have the luxury of time or money.

gap

But to be honest, I dreaded the nights we would eat canned chicken soup or tomato soups for dinners. They never tasted right for me. No matter how much of her own seasonings my mother would put in the soup, the end result was always bland and not satisfactory in the slightest.

Now I think I know the answer to why I felt like that: the ingredients the soup contained were there to create an illusion of being a real food using the cheapest ingredients possible. And the worst offender of them all is MSG. The dreaded Monosodium Glutamate is added to many store-bought foods to make them tastier but the effects it has on our bodies is still debatable. I personally avoid MSG as much as I can because my stomach feels funny after ingesting a lot if and I even become slightly lightheaded!

But let’s go back to the homemade soups. To extract that deep flavor without using artificial MSG I rely heavily on chicken stock – also homemade, of course! It’s the key to making your soup taste very rich and savory in a natural way. For this tomato basil soup, I also use cheese to give it a slight saltiness that compliments well the acidity of the tomatoes. The smooth finish is achieved by adding a little bit of cream. It’s a very simple soup and if you have some leftover chicken stock then I urge you to give it a try!

Necessary equipment:

  • a large saucepan
  • a whisk
  • a wooden spoon
  • a cheese grater
  • a sharp knife
  • a ladle

Ingredients:

  • 4 cups of chicken stock (how to make chicken stock)
  • 3 ½ cups of tomato sauce
  • ¼ cup of tomato paste
  • 1 ½ T. of honey OR 2 T. of whole cane sugar
  • 2 T. of butter
  • 1 T. of garlic powder
  • 1 T. of onion powder
  • 1 T. of dried oregano
  • 1 T. of dried basil
  • 1 T. of dried parsley
  • sea salt and pepper to taste
  • 1 cup of cream
  • 1 cup of whole milk
  • 1 cup of shredded parmesan cheese
  • 1 cup of shredded cheddar cheese
  • fresh basil for garnish

Instructions:

  1. Use a large saucepan to whisk together the chicken stock, tomato sauce, tomato paste, honey, and all the dried seasonings.
  2. Heat over medium to high heat until the soup begins simmering.
  3. Turn off the heat and add in the butter. Stir with a wooden spoon until it is completely melted.
  4. Add the cheddar cheese and parmesan cheese in small handfuls, stirring after each one. This way the cheese will melt into the soup properly. Leave some parmesan cheese for garnish.
  5. Add the milk and the cream. Stir to combine. If the soup is not creamy enough feel free to add some more.
  6. The soup is now ready. Ladle it into bowls and decorate with chopped fresh basil and the leftover parmesan.
  7. Serve hot.

Enjoy your tomato soup with some lightly toasted and buttered sourdough bread!

How to Make Ghee

Ghee is an Indian version of clarified butter. It’s not very often used here in the States but ever since I first started reading about how regular butter is different from ghee, I have been using it a lot. And I mean, really a lot. You will see why in a minute.

How to make Ghee

Advantages of Using Ghee

It might seem confusing at first. I mean, why would you go through the trouble of making your own ghee if you could have some delicious grass-fed butter instead?

Have you ever tried using butter for frying foods but had trouble with the butter burning when you used temperatures that were too high? Yup, that happens a lot. I remember being frustrated and just throwing away whatever I had in my frying pan just to start again from scratch and resorting to regular canola oil despite knowing it wasn’t good for me. So not only I wasted time but I also waster precious grass-fed butter that could have been utilized in different ways.

Higher Smoking Point 

It is possible to fry using butter but it’s difficult due to butter’s low smoke point (only about 300 degrees Fahrenheit!). No wonder it burns so easily. But ghee, or any clarified butter for that matter, has a smoke point of a whopping 482 degrees. Higher than most vegetable oils. This makes ghee perfect for cooking at high temperatures.

Low in Lactose

Ghee doesn’t contain any whey (where lactose is) or casein protein. This means that ghee can be easily digested even by people with lactose intolerance or general sensitivity to dairy. If your stomach gets upset easily, try using ghee instead of butter for a few weeks and see if you can see any difference. If you feel better then you will know that the most probable cause of your digestion issues is dairy.

Ghee is easier on the stomach and for this reason, it is recommend that you substitute butter with ghee during your GAPS diet, or at least its introductory stage.

High in Vitamin K2

Ghee has plenty of vitamin K2 which is vital for mineral absorption. But the trick is that vitamin K2 works best when combined with vitamins A and D. So when I eat seafood (which is full of vitamin D), I always use ghee instead of butter to give myself that extra vitamin K2 boost!

To make ghee at home, you will need regular butter, an oven, and some free time. And when I say “regular butter”, I really do mean regular store-bought or pasteurized butter. Technically you could use raw butter for this but I feel like that would be wasting of raw butter’s properties.

Necessary equipment:

  • a baking dish OR a French oven OR a Dutch oven
  • a ladle
  • a glass bowl
  • a cheesecloth
  • a canning funnel
  • a glass jar with a lid for storage

Ingredients:

Instructions:

  1. Preheat the oven to 300 degrees.
  2. Place the butter into your baking dish.
  3. Bake for an hour. You should see three separate layers once the butter is finished baking: milk solids at the bottom, butter oil in the middle, and a foamy layer on the top.
  4. Take your butter out of the oven.
  5. Carefully skim off the foamy top layer and discard it.
  6. Now you need to separate the middle layer (which is the actual ghee) from the solids at the bottom. You can use a ladle to skim off some of the ghee and transfer it to your glass storage jar but it is unlikely you will be able to get all of it with just this method. What I do is I set a cheesecloth over a glass bowl and put the baked butter on top of it. The solids stay on top of the cheesecloth while the liquid ghee drains into the glass bowl.
  7. Transfer all of the ghee in a storage jar and leave to cool at room temperature. It should gradually solidify and your ghee will be ready to use!

You can keep ghee at room temperature for several weeks but it will hold longer when in the fridge (usually about half a year). If you put it in the freezer, it will hold for one year.

A Guide to Vitamin K2

Vitamin K2 isn’t talked about that much. This is a real shame since it cannot be overstated how much it matters to the proper functioning of our bodies. The reason it isn’t as well-known as other vitamins is probably the fact that it wasn’t discovered until 1945.

Why Vitamin K2 So Important?

Dr. Weston Price first described the newly discovered substance as “an activator” that acted in a similar way to other vitamins. He named it Activator X. He claimed that this “activator” plays a big role in how the human body absorbs and utilizes minerals and vitamins. It also is responsible for strengthening our bones, including prevention of tooth decay, improved brain function, and protection against cardiovascular diseases. His research showed that this new compound was found mainly in meats and fats that came from animals with a grass-based diet. Vitamin K2 is converted from vitamin K (now called vitamin K1) found in grass and other rapidly growing plants by animal tissue.

I think the name “activator” really well describes the function of vitamin K2. That’s because it acts as a catalyst (it “activates”) vitamin A and D.

Here is a quote from Vitamin K2, menatetrenone that explains how vitamin K2 works:

“The synergism Weston Price observed between vitamins A, D and K2 now has a solid mechanism. In a nutshell, vitamins A and D signal the production of some very important proteins, and K2 is required to activate them once they are made. Many of these proteins are involved in mineral metabolism … For example, osteocalcin is a protein that organizes calcium and phosphorus deposition in the bones and teeth. It’s produced by cells in response to vitamins A and D, but requires K2 to perform its function. This suggests that the effects of vitamin D on bone health could be amplified greatly if it were administered along with K2. By itself, K2 is already highly protective against fractures in older people. It… also protects against vitamin D toxicity.”

The relation between these three vitamins is fascinating to me. I love how our bodies have found a way to balance all of the nutrients out.

The Power of Grass-Fed Foods

You might remember me mention vitamin K2 before. I do it often when the recipe I’m writing about uses a lot of butter. Grass-fed butter or grass-fed Ghee are an excellent source of this nourishing vitamin that is so important for our health. And not only butter but also all grass-fed dairy products. By choosing to buy grass-fed foods, you are choosing the health of you and your family.

Vitamin K2 is also often found in fermented foods like sauerkraut. That’s because the fermentation process encourages its creation. One food in particular, natto (fermented soybeans), is abundant in vitamin K2.

It would be best if our bodies, just like cows and goats, would be able to convert K1 into K2, but unfortunately that’s not how it works. That’s why we need to go slightly out of our way to get enough of it to maintain proper vitamin balance. Our ancestors didn’t have that problem because their diets were rich in grass-fed foods anyway. But currently, we as a population lack all that necessary vitamin K2.

Here is another quote from Vitamin K: The Missing Nutrient:

“However, although animals can convert vitamin K1 to K2, a significant amount of evidence suggests that humans require preformed K2 in the diet to obtain and maintain optimal health. The strongest indication that humans require preformed vitamin K2 in the diet is that epidemiological and intervention studies both show its superiority over K1. Intake of K2 is inversely associated with heart disease in humans while intake of K1 is not…and vitamin K2 is at least three times more effective than K1 at activating proteins related to skeletal metabolism.”

Can you see why we should care more about our food selection now?

How to Get More Vitamin K2 in Your Diet?

Incorporate more traditional grass-fed and fermented foods. Here’s a quick list that should hopefully help you out:

  • fermented foods like natto or sauerkraut
  • grass-fed beef
  • pastured chicken
  • chicken liver
  • egg yolks
  • high vitamin butter oil
  • hard and soft cheeses

I hope I convinced you to give these foods a try if you aren’t eating them yet!